How to Use Mozilla Thunderbird as Your Calendar Application
at SU
There is no need to run MS Outlook just because you need to use an electronic
calendar with your email program. You can still use Thunderbird even though the
calendar functionality does not come built-in as it does with Outlook.
Stockholm University uses MS Exchange mail and calendar server (DSV changed from local Apache servers to central Exchange ditto in 2014). You need to install Exchange add-ons to Thunderbird and then connect to the central servers.
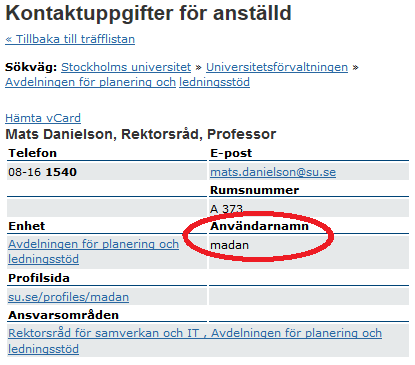
1. Ensure that you know your username
Your username begins with winadsu (as in Windows Active Directory Stockholm University) followed by a backslash and then your central account name. If you don’t know your central account name, you find it by searching for yourself in the central personnel directory (sukat.su.se). You find it under Användarnamn.
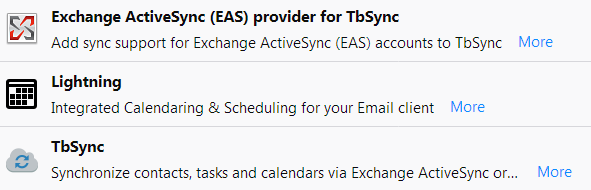
2. Retrieve and install calendar add-ons
You find them on Thunderbird’s webpages for add-ons. Or else just search for them on the Internet. The only things to look out for are compatibility rules such as “this release of this add-on is only compatible with the following main releases of Thunderbird”. Not obeying these rules can get you into sync problems later on (it did for me).
These are the three add-ons that you need:
3. Restart Thunderbird
After having installed all three add-ons, proceed by restarting Thunderbird which will then load the add-ons as a part of its normal startup sequence. Even if Thunderbird does not seem to require a restart, do it anyway. That minute or two it takes is well spent and might save you a lot of trouble later on.
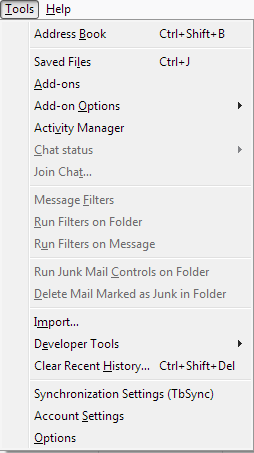
4. Open the TbSync account manager
In the Tools menu, you now have Synchronization Settings (TbSync) if your restart went properly. If not, go to add-ons and check for compatibility issues. Clicking on the menu item Synchronization Settings will open up the account manager.
![]()
5. Create a new calendar account entry
In the account manager dialogue box, near the bottom, select Account actions and then Add new account > Exchange ActiveSync (EAS).
![]()
![]()

6. Add a calendar account to TbSync
Unfortunately, automatic configuration via ActiveSync Autodiscover will not work at SU.

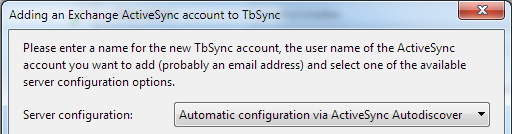
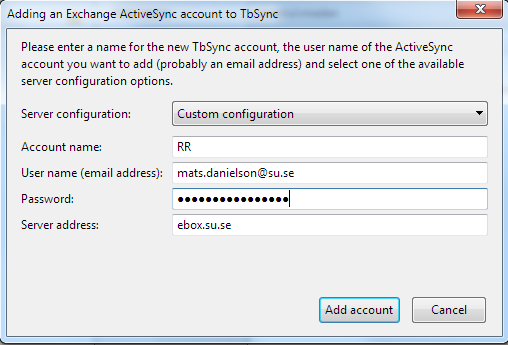
Instead, you must choose the more advanced Custom configuration. At User name (email address) enter your email address, not your username. This is important for the process to complete correctly. Name your account to something of your liking. Click on Add account when you are done. That will take you to the next dialogue box.
![]()
![]()
7. Server configuration
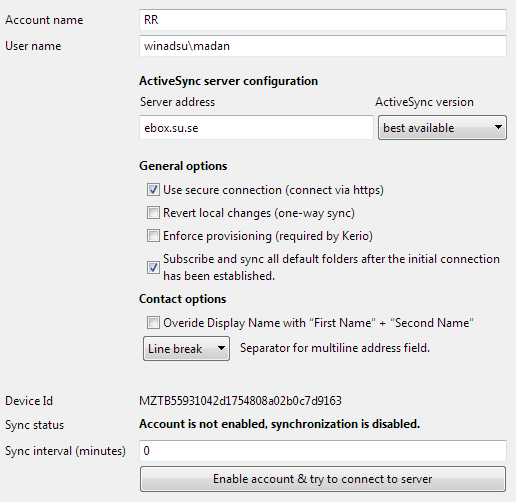
In the server configuration dialogue box, enter your username, not your email address. You should know your username from step 1 above. Note that the Account name can be anything you like, but from this point on it cannot be changed (as opposed to email accounts). Leave Sync interval at 0 for the time being. The Sync status will be “Account is not enabled”. Click on Enable account & try to connect to server when you are done.
8. Complete the account setup
The Sync status should now have changed to “Ok”. To complete the setup, change Sync interval to 5 minutes (or another positive integer of your choice). This is how frequently the program checks with the server to see if anything changed on either side.

The default sync interval of 0 disables syncing, not what you want in daily use but wise during setup. Thunderbird/Lightning/TbSync does not update the central Exchange server immediately when you have made changes to your calendar (as Outlook does, push sync). This is the only drawback that I can think of compared to Outlook. It means that you should not enter an important calendar event, then immediately close your computer and expect the update to show on your other calendar devices like your smartphone. The calendar entry will not be lost, it will just not be immediately synchronized across all your devices.
To alleviate the problem (if you find it a problem), either select the lowest sync interval (1 = every minute) or do a manual sync before closing by clicking on Synchronize this account in the TbSync account manager (accessible by clicking on the TbSync status field in the lower right corner of the main window, see step 9 for images).
![]()

9. Done!
Close the account manager by clicking in the upper right corner of the dialogue box or by pressing Alt+F4. There is no OK button for the changes to have effect, closing the window will do. The synchronization of the calendar will be shown in the status field in the lower right corner of the main window.
![]()
![]()
Enjoy having your email and calendar in the same application without having to resort to using MS Outlook!
Troubleshooting
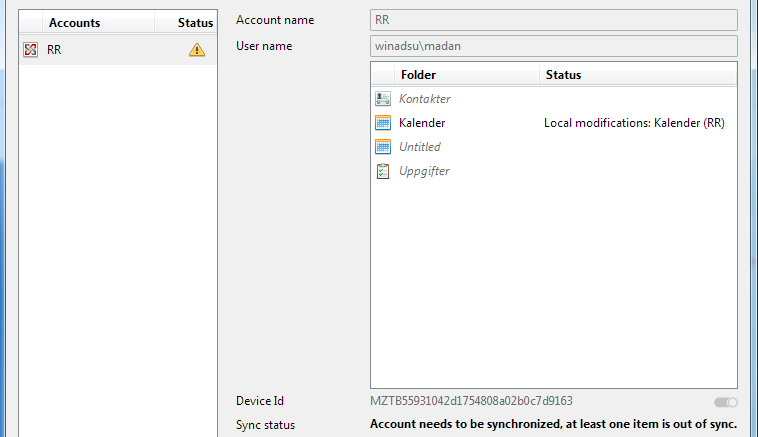
If your calendar claims it is out of sync and needs to be synchronized, this is normal and nothing to worry about. It is simply TbSync’s way of working. The warning sign with an exclamation mark just tells you there are unsaved changes. You don’t need to do anything, it will resolve within the next sync period (see also step 8 above, you might want to decrease your sync interval).
If your calendar does not at all sync with the central server even after allowing for some sync time, it has probably lost its sync altogether. Then you need to do one of three things:
1. Click on the Calendar heading in the left panel of the Calendar main tab. If your heading expands to contain the name of your calendar, then all you need to do is to restart Thunderbird.

2. If, on the other hand, your Calendar heading instead expands to contain “Local copy of…”, then you need to delete your account and reinstate it. In that case, Thunderbird/Lightning/TbSync has lost track somewhere between the server and your local disk copy of the calendar. Before you delete and reinstate, ensure that you have the latest (or at least compatible) program versions.
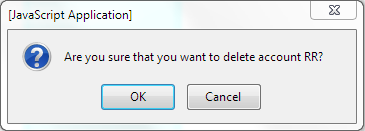
Open the TbSync account manager either by clicking on the TbSync status field in the lower right corner of the main window or by selecting Synchronization Settings in the Tools main menu. In the account manager dialogue box, near the bottom, select Account actions and then Delete account.
![]()
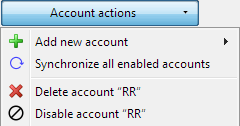
After acknowledging the deletion, proceed from step 5 above and set up your account again.
This will enable Thunderbird/Lightning/TbSync to once again sync and manage your calendar.
3. If everything else fails, uninstall and reinstall the add-ons themselves, starting at step 2 above.
This guide corresponds to Thunderbird 60.3.1, Lightning 6.2.3.1, TbSync 0.7.22, and Exchange ActiveSync (EAS) Provider 0.7.16. While I am sure menus, headings, and input fields will move around in later versions, the guide should still give you a good start in the right direction even in the future. At least it took me several hours and mishaps to reach here. The advice given here is not official in any sense and given only as is. The responsibilities while performing configuration actions rest on you.