[an error occurred while processing this directive]
This brief tutorial will take you through the steps necessary to install PetC and designing your first FSA with it.
Sections
- Creating your first FSA
- Placing arcs
- Accepting states
- Moving arcs
- Making the automaton deterministic
- Minimizing the automaton
- Running your FSA
When you run PetC you are greeted with an empty window with icons and lots of menus at the top. To begin constructing your FSA click on the leftmost icon. Two windows will open, one containing your new FSA and one where you can set the alphabet of it. In the later window click on the button labeled "ab". The window will then look like this:
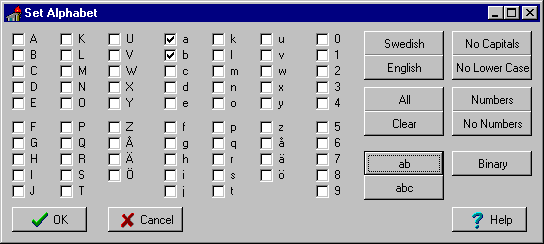
After that click on the button labeled "Ok" to close the window. Your new automaton is currently very simple. It contains only one state, a nonfinal starting state labeled "0".

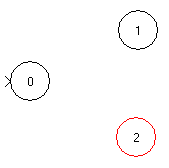
To get an automaton that does something more useful, lets place some more states. Select the state-tool (the icon with the circle) and click where you want to have the states. Your automaton should now look something like this:
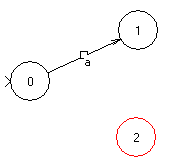
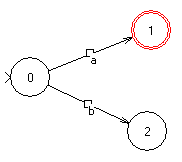
Now we'll need some arcs. Select the arc-tool (the arrow with an A above) and draw a line between state 0 and state 1 while holding down the left mouse-button. When you release the mouse-button a new window will open where you can select what label the new transition shall have.

Press the a-button on the keyboard or click in the box labeled "a" so that it looks like the image above. When you click "Ok" a new transition will be added between the states 1 and 2, and your automaton will look something like this:
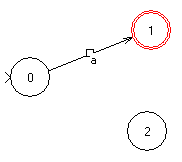
To make the FSA accept the language "a" we need to make state 1 a final state. This is done with the change-tool (the arrow). Select it and double-click on state 1. It will now be marked with tow circles in stead of one, showing that it is a final state.
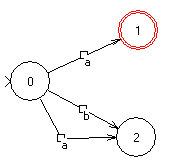
We now have a working automaton, but before we try it lets do some other things. Switch back to the arc-tool and place transitions for both a and b between state 0 and 2 (by selecting both checkboxes in the arc-window).
Now it looks as if we only got one transition labeled "b". This is because the other one is drawn in exactly the same position. Move one of them by switching to the change-tool (the arrow) and position the mouse-pointer above the little box besides the b. Press the left mouse-button and move the mouse (while keeping the button pressed) to the position you want the vertex to be in. When you get there release the mouse-button. One of the two arcs (probably the a) has now a new path.
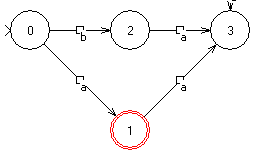
Now we have a fully working automaton accepting the language "a", but unfortunately it's non-deterministic. There are two transitions labeled "a" out of state 0. To get a deterministic automaton in stead press the button with the signpost. Now we have our deterministic automaton.
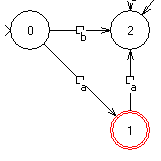
We're not done yet though, this automaton isn't minimal. The states 2 and 3 could easily be replaced by one. This is done by clicking the minimization-button (the one with two black squares with an arrow between them). This gives us the following automaton, which is the smallest total FSA accepting the language "a"
Tips: If you have a large automaton and want's to find out how many states it have look under the menu "Question|Nr of states"
To run your FSA you enter a string in the combobox (text-box with menu) in the lower left corner of the FSA-window and press one of the run buttons (the first two buttons in the image below).

The first one is for running FAST. The only thing you'll see is the state the automaton ended in and whether or not the string was accepted. The second is for running more slowly. in this mode you'll se each transition being made. It is of little use for such a small automaton, but try the string "abb" on it anyway.